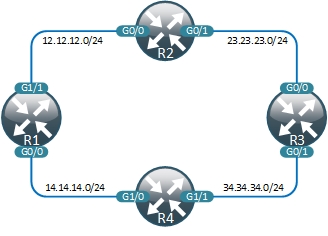
Demo network overview
The network consists of 4 nodes interconnected via point-to-point links and running EIGRP as a routing protocol.
To create a local development environment you can clone my repository and reset it to work with your own Github account using git remote set-url origin https://github.com/USERNAME/OTHERREPOSITORY.git command.
Local development environment contains the following files describing the modelled topology:
- Configuration files for each node under the
./configdirectory - Network topology in
./network/topology.pymodelled as a list of pairs of interconnected devices - UNetLab configuration file containing the IP address and username/passwords to access the server
- Traffic flow test definitions under
./network/testdirectory
Test definitions
Traffic flow test file contains an ordered set of test scenarios that will be performed automatically. The following is an example that illustrates main capabilities of our test tools:
# Normal operations
1 Failed None
  From R1 to R3 via R2 or R4, R3
  From R2 to R3 via R3
  From R2 to R4 via R1 or R3

# Failed link between R1 and R2
2 Failed R1 Gig1/1, R2 Gig0/0
  From R1 to R2 via not R2, R3
  From R2 to R4 via not R1, R4
Each scenario starts with a failure definition. It could be either None, which represents normal network conditions, or it could contain a list of interfaces that need to be failed. Following the failure definition are the actual tests. On each line we define source, destination and the path we expect the traffic to take. Path definition (everything following the ‘via’ keyword) contains an ordered set of nodes and can use simple boolean operators like or or not.
Ping flow definition file is a lot shorter and simply contains a list of source/destination pairs to run a ping test between. All ping tests will execute concurrently and issue only 2 pings, therefore we’ll only be able to detect connectivity loss if it lasts for more than 4 seconds.
Jenkins setup
In the previous post we’ve automatically built a VM with Jenkins and UNetLab pre-installed. Before we can start using Jenkins we need to install a Github plugin, which can be done very easily from Jenkins GUI. Power up your vm-network-ci and open Jenkins home page at http://VM_IP:8080. From there navigate to Manage Jenkins -> Manage Plugins -> Available, search for and install the GitHub plugin.
A quick Jenkins intro
Inside Jenkins, a job represents a set of tasks that need to be automated for a particular project. Each job first waits for a trigger, which can be either a manual or an automatic event. When triggered, it connects to Github repository, downloads all the code to a local machine and executes a set of build steps defined in this job. A very simple workflow would looks like this:
- Developer commits and pushes a change to a Github repository
- Github notifies Jenkins server by sending an HTTP POST request
- Jenkins identifies the job that needs to be run and clones Github repo into a local directory
- It then goes through and executes a set of build steps defined for this job
- At the end you can optionally configure Jenkins to update the status of the build as described here
Using Jenkins for network testing
- From Jenkins home page click on create new jobs and create a Freestyle project called acme-small.
- Select the Github project option and enter a url of your Github repository (in my case its https://github.com/networkop/network-ci).
- Under Source Code Management select Git and enter the same repository URL.
- Under Additional Behaviours add a Polling ignores commits in certain paths.
Since I’m keeping multiple subprojects in the same Github repo, I need to make sure that this job is only triggered if commit affected a particular directory. - Under Included Regions add
acme-small/.*to only trigger builds for changes made to acme-small directory. - Optionally you can specify the build triggers to either build periodically or wait for changes to be pushed to Github.
Under Build add a new build step with the following shell commands:
export UNL_IP="unl_ip_address"
export PYTHONUNBUFFERED=1
cd acme-small
chmod +x 0_built_topo.py
chmod +x 2_test.py
chmod +x 3_destroy_topo.py
./0_built_topo.py
./2_test.py
./3_destroy_topo.py
The first two env variables setup the UNL’s IP address of and disable IO buffering so that we can see the output produced by our scripts in real time. The remaining steps simply execute the build, test and destroy scripts in order.
Save the job and click on the Build Now to trigger the build manually.
In the Build History pane click on the latest build number (should be #1) and go to Console Output.
Observe how Jenkins builds, tests and destroys our demo topology
Network upgrade workflow
Now imagine that a new requirements has come in to make sure that traffic from R1 to R3’s Gig0/1 does not traverse R4 and goes via R2 instead, only falling back to R4 when R1-R2 link is down. In the following video I’ll show how to use network-ci tools locally to implement and test this traffic engineering requirement.
Coming up
In the next post I’ll show how to apply the same workflow to automate the build, test and ugprade of a large 14-node topology.