Vanilla OpenStack networking has many functional, performance and scaling limitations. Projects like L2 population, local ARP responder, L2 Gateway and DVR were conceived to address those issues. However good a job these projects do, they still remain a collection of separate projects, each with its own limitations, configuration options and sets of dependencies. That led to an effort outside of OpenStack to develop a special-purpose OVS-only SDN controller that would address those issues in a centralised and consistent manner. This post will be about one such SDN controller, coming directly from the people responsible for OpenvSwitch, Open Virtual Network (OVN).
OVN quick introduction
OVN is a distributed SDN controller implementing virtual networks with the help OVS. Even though it is positioned as a CMS-independent controller, the main use case is still OpenStack. OVN was designed to address the following limitations of vanilla OpenStack networking:
- Security groups could not be implemented directly on OVS ports and, therefore, required a dedicated Linux bridge between the VM and the OVS integration bridge.
- Routing and DHCP agents required dedicated network namespaces.
- NAT was implemented using a combination of network namespaces, iptables and proxy-ARP.
OVN implements security groups, distributed virtual routing, NAT and distributed DHCP server all inside a single OVS bridge. This dramatically improves performance by reducing the number of inter-process packet handling and ensures that all flows can benefit from kernel fast-path switching.
At a high level, OVN consists of 3 main components:
- OVN ML2 Plugin - performs translation between Neutron data model and OVN logical data model stored in Northbound DB.
- OVN northd - the brains of OVN, translates the high level networking abstractions (logical switches, routers and ports) into logical flows. These logical flows are not yet OpenFlow flows but similar in concept and a very powerful abstraction. All translated information is stored in Southbound DB.
- OVN controllers - located on each compute node, receive identical copies of logical flows (centralised network view) and exchange logical port to overlay IP binding information via the central Southbound DB. This information is used to perform logical flow translation into OpenFlow which are then programmed into the local OVS instance.
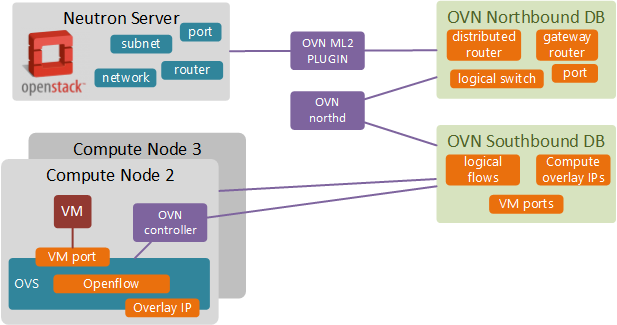
If you want to learn more about OVN architecture and use cases, OpenStack OVN page has an excellent collection of resources for further reading.
OpenStack installation
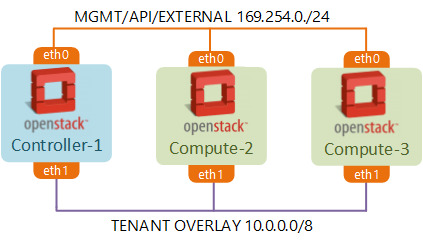
I’ll use RDO packstack to help me build a 1 controller and 2 compute nodes OpenStack lab on CentOS7. I’ll use the master trunk to deploy the latest OpenStack Ocata packages. This is required since at the time of writing (Nov 2016) some of the OVN features were not available in OpenStack Newton.
cd /etc/yum.repos.d/
wget http://trunk.rdoproject.org/centos7/delorean-deps.repo
wget https://trunk.rdoproject.org/centos7-master/current/delorean.repo
On the controller node, generate a sample answer file and modify settings to match the IPs of individual nodes. Optionally, you can disable some of the unused components like Nagios and Ceilometer similar to how I did it in my earlier post.
yum install -y openstack-packstack crudini
packstack --gen-answer-file=/root/packstack.answer
crudini --set --existing defautl CONFIG_COMPUTE_HOSTS 169.254.0.12,169.254.0.13
crudini --set --existing defautl CONFIG_CONTROLLER_HOST 169.254.0.11
crudini --set --existing defautl CONFIG_NETWORK_HOSTS 169.254.0.11
packstack --answer-file=/root/packstack.answer
After the last step we should have a working 3-node OpenStack lab, similar to the one depicted below. If you want to learn about how to automate this process, refer to my older posts about OpenStack and underlay Leaf-Spine fabric build using Chef.
OVN Build
OVN can be built directly from OVS source code. Instead of building and installing OVS on each of the OpenStack nodes individually, I’ll build a set of RPM’s on the Controller and will use them to install and upgrade OVS/OVN components on the remaining nodes.
Part of OVN build process includes building an OVS kernel module. In order to be able to use kmod RPM on all nodes we need to make sure all nodes use the same version of Linux kernel. The easiest way would be to fetch the latest updates from CentOS repos and reboot the nodes. This step should result in same kernel version on all nodes, which can be checked with uname -r command.
yum -y update kernel
reboot
The official OVS installation procedure for CentOS7 is pretty accurate and requires only a few modifications to account for the packages missing in the minimal CentOS image I’ve used as a base OS.
yum install rpm-build autoconf automake libtool systemd-units openssl openssl-devel python python-twisted-core python-zope-interface python-six desktop-file-utils groff graphviz procps-ng libcap-ng libcap-ng-devel

yum install selinux-policy-devel kernel-devel-`uname -r` git

git clone https://github.com/openvswitch/ovs.git && cd ovs
./boot.sh
./configure
make rpm-fedora RPMBUILD_OPT="--without check"
make rpm-fedora-kmod
At the end of the process we should have a set of rpms inside the ovs/rpm/rpmbuild/RPMS/ directory.
OVN Install
Before we can begin installing OVN, we need to prepare the existing OpenStack environment by disabling and removing legacy Neutron OpenvSwitch agents. Since OVN natively implements L2 and L3 forwarding, DHCP and NAT, we won’t need L3 and DHCP agents on any of the Compute nodes. Network node that used to provide North-South connectivity will no longer be needed.
OpenStack preparation
First, we need to make sure all Compute nodes have a bridge that would provide access to external provider networks. In my case, I’ll move the eth1 interface under the OVS br-ex on all Compute nodes.
DEVICE=eth1
NAME=eth1
DEVICETYPE=ovs
TYPE=OVSPort
OVS_BRIDGE=br-ex
ONBOOT=yes
BOOTPROTO=none
IP address needs to be moved to br-ex interface. Below example is for Compute node #2:
ONBOOT=yes
DEFROUTE=yes
IPADDR=169.254.0.12
PREFIX=24
GATEWAY=169.254.0.1
DNS1=8.8.8.8
DEVICE=br-ex
NAME=br-ex
DEVICETYPE=ovs
OVSBOOTPROTO=none
TYPE=OVSBridge
At the same time OVS configuration on Network/Controller node will need to be completely wiped out. Once that’s done, we can remove the Neutron OVS package from all nodes.
yum remove openstack-neutron-openvswitch
OVS packages installation
Now everything is ready for OVN installation. First step is to install the kernel module and upgrade the existing OVS package. Reboot may be needed in order for the correct kernel module to be loaded.
rpm -i openvswitch-kmod-2.6.90-1.el7.centos.x86_64.rpm
rpm -U openvswitch-2.6.90-1.el7.centos.x86_64.rpm
reboot
Now we can install OVN. Controllers will be running the ovn-northd process which can be installed as follows:
rpm -i openvswitch-ovn-common-*.x86_64.rpm
rpm -i openvswitch-ovn-central-*.x86_64.rpm
systemctl start ovn-northd
The following packages install the ovn-controller on all Compute nodes:
rpm -i openvswitch-ovn-common-*.x86_64.rpm
rpm -i openvswitch-ovn-host-*.x86_64.rpm
systemctl start ovn-controller
The last thing is to install the OVN ML2 plugin, a python library that allows Neutron server to talk to OVN Northbound database.
yum install python-networking-ovn
OVN Configuration
Now that we have all the required packages in place, it’s time to reconfigure Neutron to start using OVN instead of a default openvswitch plugin. The installation procedure is described in the official Neutron integration guide. At the end, once we’ve restarted ovn-northd on the controller and ovn-controller on the compute nodes, we should see the following output on the controller node:
$ ovs-sbctl show
Chassis "d03bdd51-e687-4078-aa54-0ff8007db0b5"
    hostname: "compute-3"
    Encap geneve
        ip: "10.0.0.4"
        options: {csum="true"}
    Encap vxlan
        ip: "10.0.0.4"
        options: {csum="true"}
Chassis "b89b8683-7c74-43df-8ac6-1d57ddefec77"
    hostname: "compute-2"
    Encap vxlan
        ip: "10.0.0.2"
        options: {csum="true"}
    Encap geneve
        ip: "10.0.0.2"
        options: {csum="true"}
This means that all instances of a distributed OVN controller located on each compute node have successfully registered with Southbound OVSDB and provided information about their physical overlay addresses and supported encapsulation types.
(Optional) Automating everything with Chef
At this point of time there’s no way to automate OVN deployment with Packstack (TripleO already has OVN integration templates). For those who want to bypass the manual build process I have created a new Chef cookbook, automating all steps described above. This Chef playbook assumes that OpenStack environment has been built as described in my earlier post. Optionally, you can automate the build of underlay network as well by following my other post. Once you’ve got both OpenStack and underlay built, you can use the following scripts to build, install and configure OVN:
git clone https://github.com/networkop/chef-unl-os.git
cd chef-unl-os
chef-client -z -E lab ovn.rb
Test topology setup
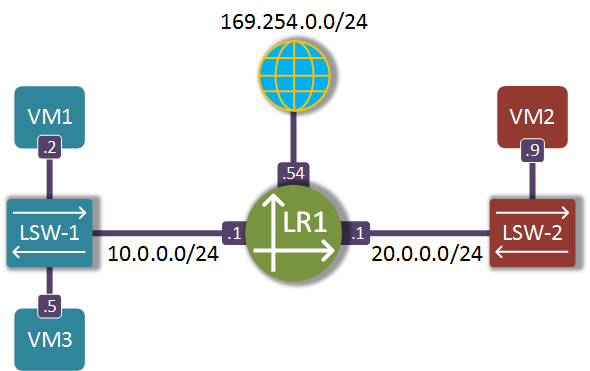
Now we should be able to create a test topology with two tenant subnets and an external network interconnected by a virtual router.
neutron net-create NET-RED
neutron net-create NET-BLUE
neutron subnet-create --name SUB-BLUE NET-BLUE 10.0.0.0/24
neutron subnet-create --name SUB-RED NET-RED 20.0.0.0/24
neutron net-create NET-EXT --provider:network_type flat \
                           --provider:physical_network extnet \
                           --router:external --shared
neutron subnet-create --name SUB-EXT --enable_dhcp=False \
                      --allocation-pool=start=169.254.0.50,end=169.254.0.99 \
                      --gateway=169.254.0.1 NET-EXT 169.254.0.0/24
neutron router-create R1
neutron router-interface-add R1 SUB-BLUE
neutron router-interface-add R1 SUB-RED
neutron router-gateway-set R1 NET-EXT
When we attach a few test VMs to each subnet we should be able to successfully ping between the VMs, assuming the security groups are setup to allow ICMP/ND.
curl http://download.cirros-cloud.net/0.3.4/cirros-0.3.4-x86_64-disk.img | glance \
image-create --name='IMG-CIRROS' \
  --visibility=public \
  --container-format=bare \
  --disk-format=qcow2
nova aggregate-create AGG-RED AZ-RED
nova aggregate-create AGG-BLUE AZ-BLUE
nova aggregate-add-host AGG-BLUE compute-2
nova aggregate-add-host AGG-RED compute-3
nova boot --flavor m1.tiny --image 'IMG-CIRROS' \
  --nic net-name=NET-BLUE \
  --availability-zone AZ-BLUE \
  VM1

nova boot --flavor m1.tiny --image 'IMG-CIRROS' \
  --nic net-name=NET-RED \
  --availability-zone AZ-RED \
  VM2
nova boot --flavor m1.tiny --image 'IMG-CIRROS' \
  --nic net-name=NET-BLUE \
  --availability-zone AZ-RED \
  VM3
openstack floating ip create NET-EXT
openstack server add floating ip VM3 169.254.0.53
In the next post we will use the above virtual topology to explore the dataplane packet flow inside an OVN-managed OpenvSwitch and how it uses the new encapsulation protocol GENEVE to optimise egress forwarding lookups on remote compute nodes.